Saturday, August 10, 2019

The IT Crowd Cosplay: Moss & Roy


The IT Crowd is one of my all time favorite shows. When my partner (Devin) and I started dating he had never seen the show before. I told him to watch it and he instantly fell in love. It is one of the shows that we constantly quote from. Last fall we went to Santa Fe Comic Con for his birthday. I wanted to make a new costume but didn't have a lot of time. I had the idea to dress up as Moss & Roy. This is essentially a closet cosplay. 


I got all of the stuff for Moss at the thrift store. Luckily it was around Halloween so they had a lot of costume items out. I was able to find the afro wig for pretty cheap. The wig was really easy to style. I just parted it where I wanted it and then just pinned the back down so it wasn't totally round. I bought the shirt, tie, and pants from the thrift store. The watch we already owned. The glasses are my real glasses. (haha)


For Roy we had to decide what shirt from the show to recreate. We decided on the Space Invaders shirt because it is the shirt he wears in the first episode and the one he has in the opening theme. We just printed it on fabric transfer paper and ironed it on a plain black shirt the day of the con. I bought the army green jacket from the army surplus store. We printed a sign out on computer paper and called it a day. 


Every time we wear these costumes they always seem like a big hit. We've worn them to three cons at this point. It is always fun to see people's reaction to them. Most people will recognize me as Moss first and then when Devin shows them the sign they get more excited. Moss & Roy have turned into our favorite casual, easy day cosplay. 


"Couldn't we just have hidden behind those bins?"


Check out my instagram for more up to date posts and things that I am currently making @cherelledx and check out Devin too @lyn2win! 

Wednesday, July 17, 2019

Soldier 76 Grillmaster Cosplay


Last summer I bought a PS4 and was playing a lot of Overwatch. My partner (Devin) and I decided to dress up as Soldier 76 and D.VA for Denver Comic Con. We didn't finish them in time so we wore them for Colorado Springs Comic Con instead. This cosplay was deceptively difficult to make. I didn't think it would take very long but it has a lot of little details. Anyway here is how I did it.

Apron


First things first was the apron! I used an easy pattern to make the base apron. (I don't remember which one.) We bought a spatula and tongs from the Dollar Tree, spray painted them black and added the neon details. The spices were just empty spice jars from my cabinet that I spray painted the lids black.

For the pockets I made a pattern out of paper. I used two pieces of fabric and sewed them, right sides together, then turned them inside out to form a strip. I folded that strip into thirds to form the pocket. They are useable pockets albeit not very good or big ones. I sewed them on the apron with black thread to kind of match the original design. I left the bottom open so I could add the silver wire detail. I added silver rivets to the top flaps of the pockets and I glued black bias tape to the top flap as well.


I attached the tongs by making button holes where I thought they should go. I painted hooks from the dollar tree to match the fabric and put them through the button holes. I just glued them in place and they held pretty well. If I had more time I probably would have sewn a patch over the hooks on the back for extra security. Then we just used hair ties to keep the tongs/spatula on the hooks.


To attach the spices I used two strips of fabric. Sewed them right sides together, then turned them inside out. I placed the spices where I wanted them to be and pinned the fabric around them so that the fabric would hold them in place. Then I just sewed the strip of fabric where I pinned it. Then put the spices back in and they held all day pretty well. 

For the "Raise the Steaks" and "Dang!" details we took them to a place to get screen printed but I do not suggest this entirely because they didn't do what we had asked. I personally am a control freak and I don't like giving away creative control to somebody else. I have a PDF for a graphic that I made on google docs here. The first go around of the apron we tried to paint it on but the stencil got stuck to the apron and it didn't work out that well but if we had more time it would have worked better I think. It is all a learning process and the end result turned out fine. 

Shirt

Remember you're painting Hawaiian flowers and not four leaf clovers. (haha) Luckily I only painted one bad one and was able to fix the rest. 
For the Hawaiian shirt we just bought a red shirt from the thrift store. I painted on the Hawaiian flowers. I tried to use stencils but found it to be more difficult than it needed to be. I just free handed them with chalk and then painted them with white paint. The 76 on the back is cut out from felt and glued on to the back. I have PDFs of the 76 you can download. I hand drew them myself. For the 7 you can find it here and for the 6 you can find it here. 


Arm Band

For the arm band I just used a children's belt from the thrift store and cut it down to fit around Devin's arm. I spray painted empty soda cans silver. 


I created a graphic for the cans out of pictures online. Then printed it out on normal printer paper. It is not the best but it gets the job done. You can find the PDF for it here. I just used Mod Podge to glue the graphic on the cans.


I cut down another belt I bought from the thrift store and glued those pieces around the cans. Then glued the cans onto the arm belt.


Shorts, Sandals, Watch, & other small details

Nothing too crazy here. We bought a pair of cargo shorts from the thrift store. Bought the dad sandals at Kohl's. The watch and socks Devin already owned. We sprayed his hair and beard with white hair spray. We made scars out of liquid latex and lipstick. The sunglasses we bought from the thrift store. The dish towel we bought at the Dollar Tree and just stuck it in one of the short's pockets. 


All in all I think this cosplay came out really well. It was well received. I think my favorite part of wearing our Overwatch cosplays was when a little kid came up to us all excited and told us that these were the skins they had on their players.

Found a cool McCree. I'll post how I made my D.VA in another post!

I think I would like to add some of the other details from this skin  but haven't found another con that we will wear these to. Just have to wait for Overwatch 2!

I hope this was helpful if you are on your own quest to making a Grillmaster 76 cosplay! If you have any questions feel free to contact me! I am normally pretty quick to respond. Check out my instagram for more up to date progress and pictures @cherelledx! Also check out Devin's Instagram @Lyn2win 

Wednesday, June 19, 2019

Bender Tile Graffiti Granny Square Blanket


One thing about me is that I absolutely love Futurama. It has become such a big part of my life. I quote it on a regular basis, have t-shirts, stickers on my car, and I have cosplayed from it as well. So when I saw the episode Proposition Infinity, I knew I had to make Bender's tile graffiti into a granny square blanket. 

I have never made a granny square blanket or even a granny square before so it was definitely a learning experience. I used this tutorial for the squares and this tutorial to stitch them together. I fleece lined it as well using this tutorial. It took me about two years to finish crocheting all the squares, stitching them together (because I did it wrong) and fleece lining it. I am a pretty slow worker. 


Overall I am pretty happy with how it came out and it is really comfy and warm. It does sort of class up the place. ;)


Follow me on instagram for more up to date projects that I am working on @cherelledx!


Tuesday, February 9, 2016

Crochet BB-8 Beanie Pattern


I've seen The Force Awakens three times. I think I saw all in about two weeks. It is absolutely one of the best movies I have ever seen. Feeling a little inspired with all the Star Wars awesomeness I decided to make a BB-8 beanie

For the beanie

Hook Size J /10-6.00 MM
Work in continuous rounds 
With white 

Chain 3, sl st together 

Round 1- 6 SC in center of circle 
Round 2- 2 DC in each stitch (12)
Round 3- 2 DC in each stitch (24) Change color to gray 
Round 4- 2 DC in each stitch (48) 
Round 5- 1 DC in each stitch, change color to white
Round 6- 1 DC in each stitch, change color to orange 
Round 7- 1 DC in each stitch, change color to white 
Round 8-11- 1 DC in each stitch
Round 12- There is a lot of color changes in this round. 13 DC in first 13 stitches, 1 orange stitch, 1 white, 1 orange, 1 white, 5 orange, 1 white, 1 orange, 11 white, 3 orange, 1 white, 1 orange, 7 white, change color to gray. 
Round 13- 1 DC in each, change color to white 
Round 14- 1 DC in each 
Round 15- 1 SC in each, sl st into second chain from hook, finish off sew in ends. 

For the big "eye"

Hook size G/6- 4.25 MM 
Work in continuous rounds 
With black

Ch 3, sl st together 
Round 1- 6 SC in center 
Round 2- 1 SC, 2 SC in second, repeat around the round (9)
Round 3- 1 SC in next 2 stitches, 2 SC in the third (12)
Round 4- 1 SC in next 3 stitches, 2 SC in the fourth (15)
Round 5- 1 SC in next 4 stitches, 2 SC in fifth (18)
Round 6- 1 SC in next 5 stitches, 2 SC in the sixth (21)
Sl St second chain from hook, finish off, leave long tail to sew onto the hat. 

Use red yarn to give the "eye" a little light. 

For the smaller "eye"

Hook size G/6- 4.25 MM 
Work in continuous rounds 
With black

Ch 3, sl st together 
Round 1- 6 SC in center 
Round 2- 1 SC, 2 SC in second, repeat around the round (9)
Round 3- 1 SC in next 2 stitches, 2 SC in the third (12) Change color to white
Round 4- 1 SC in next 3 stitches, 2 SC in the fourth (15) Change color to black 
Round 5- 1 SC in next 4 stitches, 2 SC in fifth (18)
Sl st second chain from hook, finish off, leave long tail to sew onto hat 


I used poly fiber fill to stuff the eyes so they would hold their shape. If you don't want them so three dimensional you can join rounds instead of doing continuous rounds and they will lay more flat. 

Sew eyes onto the beanie and you're done!

I hope you enjoy the pattern and if you have any questions feel free to contact me. I am normally pretty quick to respond. :)

Download the printable PDF here. 

If you use my pattern send me pictures on Instagram @chocolatebearz or on tumblr. I would love to see what you come up with. 


Thursday, November 5, 2015

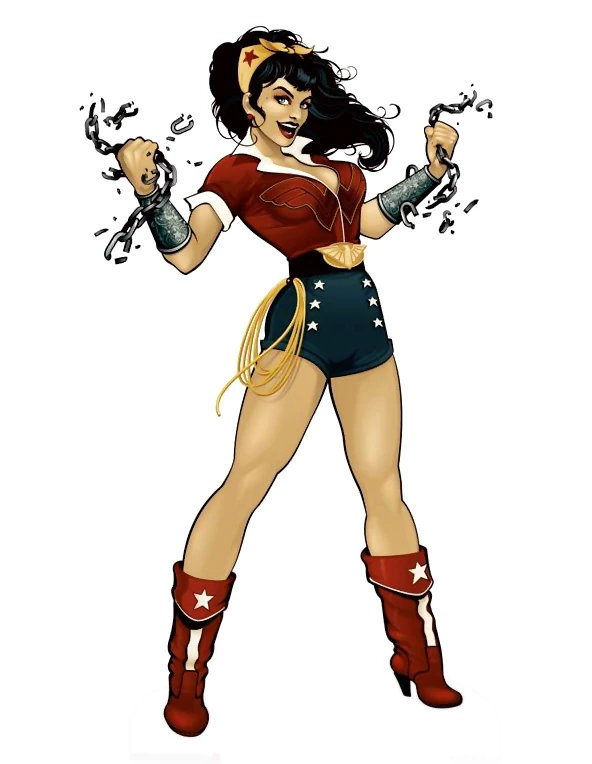
Bombshell Wonder Woman Costume


This year for Halloween I decided to dress up as Bombshell Wonder Woman. I love this whole series that DC has done. I thought Wonder Woman would be a good place to start because hers seemed to be the least complicated and that I could easily put it together. Turns out all the little accessories weren't the most time friendly things to put together. The things I thought would be the hardest didn't actually end up being that complicated. This isn't necessarily a "how to" but more of a way to share what I did and to share some ideas on how I did it. 


Shirt

I bought a red long sleeved button down shirt from the thrift store. Cut the sleeves off and added a zipper, collar, and the little sleeve embellishments(?) I also took it in at the waist so it could be a little more form fitting. 


Emblem on the shirt

I found an image of the Wonder Woman logo and blew it up to the size I wanted it to be and halved it so I could transfer the image to both sides of the shirt. I printed it out and used chalk to trace the outline. I then put the emblem on the shirt where I wanted it to be to transfer the chalk outline. I used Tulip soft fabric paint to paint over the chalk outline.


Shorts

I didn't take any pictures of the shorts because they weren't too involved. I used a pair of high waisted shorts that I had bought from Forever 21. I just used iron on star patches for the stars on the shorts.

Boots

The boots were a pair of cheap boots that I had bought from Gordmans. I used leather paint to paint them red and paint on the details. I used pleather fabric to add the boots cuffs.

Not the best before picture but I cut off the buckles and painted them red. 
So once I painted them red, I used a pleather fabric that kind of matched the material of the boot. I cut out the shape that I liked for the boot cuff and just hot glued them on to the inside of the boot. I then painted the cuff red to match the boot.
I used white leather paint to add the details. I suggest adding the star to the cuff before adding it to the boot.


Arm cuffs

I used craft foam, foam stars, puffy paint, spray paint, and velcro to make the arm cuffs. I got a pattern for the arm cuffs here. I cut them out of craft foam. I glued small bands of craft foam on the top and bottom of the cuffs. I used velcro to secure them around my wrists. 

I hot glued craft foams stars around the cuffs. I used a sharpie to draw the design around the cuffs that I wanted. 

I used puffy paint to trace over the design I created. I let the puffy paint dry and spray painted them silver.  Once they were painted silver I sponged on black acrylic paint to give them a bit more dimension.


Belt/lasso

The belt was a lucky find from the thrift store which ended up working perfectly. The belt buckle I made out of craft foam. I have scans of my design here & here. 
  
I cut the design out of craft foam. I added an outer edge of the circle part of the belt. I added an extra bird head piece and the details of the wings on to the base of the bird part.


I painted the yellow foam black or you could ya know just buy black craft foam. I thought the gold would show up better on black but painting the yellow foam gold would work just as well. Once they were painted gold, I glued them together and added two strips of craft foam to the back to attach them to the belt I had bought.


For the lasso I used some twine I had laying around the house. I'm not exactly sure what it was. I measured how long I wanted my lasso to be and I doubled the length. I folded all the lengths of twine in half and just roped braided the whole thing. I then spray painted it gold. Once the paint had dried I wrapped it up and secured it so it wouldn't unwind. I used a strip of black craft foam to attach it to the belt. 

Earrings

I made earrings out of polymer clay. I used the smallest measuring spoon I had as a mold. Once I got the clay out of the spoon I just baked them. Once they were done baking I glued them onto earring posts. 

Headband

I bought a yellow bandana from the craft store and ironed on an iron on red star. Easy peasy. :)

I wasn't able to get too many great pictures of it once it was all done since I was in Vegas for Halloween. I'm hoping I'll be able to go to DCC next year and wear it there. 


I think it came out really nice. Unfortunately no body knew who I was supposed to be but I was impressed with myself and I guess that is all that really matters. :P I think I might eventually try to get better pictures taken of the whole thing but until then the pictures I have will have to do.

I hope I gave you some ideas on how to make your own bombshell Wonder Woman! If you have an questions always feel free to contact me. I'm normally pretty quick to respond! :)

Wednesday, October 29, 2014

Crochet Donnie Darko Amigurumi

Coming at you with another Amigurumi. This time it is Donnie Darko! Donnie Darko is my favorite movie. Since it is almost Halloween, I thought it was fitting to try to make a little Donnie Darko. This is what I came up with and honestly I think it is one of my favorite things that I have made. I used this pattern here for the base and I came up with his little hoodie.

I used safety eyes for his eyes. I sewed him a little mouth by pulling yarn through the back and around the front where I wanted it to be and then putting the yarn back inside. I just tied it in a knot and called it good. The little bones are iron on transfers and I just glued them on. For his hair I drew the outline of where I wanted his hair to be and then I just kind of filled it in with yarn. It's kind of hard to explain how I did it.


I came up with my own pattern for his hoodie and then I sewed his arms on outside of it to secure it on his body. His little hood even comes off.

That's about it! I'm really happy with the way he came out. I think it's super cute and he's going to look totally awesome on my bookcase.

Sunday, October 19, 2014

Elder Wand Crochet Hook + new listing!

I got requested a LONG time ago to do this crochet hook. I had tried one attempt, didn't like it and then gave up on making another one. For whatever reason I got inspired to try to make it again. My skills have gotten better and I have better tools and techniques so I figured the second attempt would be better. Sure enough it was! I think this one came out pretty neat.

It is made out of tan polymer clay. I used different sized dotting tools to make weird oblong circles on it. Then I painted it with different shades of brown paint. I used a pencil and black paint to paint the small details on the band.

I think it came out pretty good and fairly true to the movie wand. I'm going to be selling these on Etsy. I normally do tutorials with these but wasn't sure if anyone was going to be interested in seeing that but if you are, you can shoot me a comment or message and I would be more than willing to put one up! If that's not your thing you can buy one from my etsy here.

I have other crochet hooks that you can make that you can find in my tutorial page here.

Tuesday, October 7, 2014

Crochet Superman Amigurumi

It's been forever since I have posted anything! I normally try to post once a month but the past few months I haven't had a whole lot of motivation but I'm back and I should have a few blogs out over the next few weeks (hopefully)

Anyway, I work at a comic book store and thought I would make something for the guys at work. I decided on Superman because I thought he would be the simplest to put together. I used this pattern here. I have used this pattern before and I liked it. This time I decided to do joined rounds and I got a better result this time.

I used felt for his cape and iron on transfers (these are becoming my favorite for logos) for the logo. I just used glue to put the cape and logo on because I'm too lazy to sew it on. Since he will probably never need to be washed I didn't find it problematic. I used safety eyes for his eyes. I also figured out a better way to give him hair. I think the end result is pretty awesome and cute.


The guys at work thought he was neat. One guy is a huge Superman fanatic so he absolutely loved him. He looks pretty cool in the comic book shop.

If you guys have any questions on how I put him together feel free to ask. He was pretty simple to put together. It is not my pattern but I can tell you where I did color changes and things like that. :)

Roberto from Futurama Cosplay

Welp, back at it again with another Futurama post! I have mentioned in previous posts that Futurama is my favorite show. Roberto is one...